参考语法

配置文件列表

server {
    listen 80;
    listen [::]:80;

    root /var/www/example.com;
    index index.php index.html index.htm;

    server_name example.com;

    location / {
        try_files $uri $uri/ =404;
    }

    location ~ \.php$ {
        include snippets/fastcgi-php.conf;
        fastcgi_pass unix:/run/php/php7.2-fpm.sock;
    }
}
server {
    listen 80;
    listen [::]:80;

    root /var/www/example.com;
    index index.php index.html index.htm;

    server_name example.com;

    location / {
        try_files $uri $uri/ =404;
    }

    location ~ \.php$ {
        root           C:/wnmp/nginx-1.5.8/html;
        fastcgi_pass   127.0.0.1:9000;
        fastcgi_index  index.php;
        fastcgi_param  SCRIPT_FILENAME  $document_root$fastcgi_script_name;
        include        fastcgi_params;
    }
}
server {
    listen       80;
    server_name  example.com;

    charset utf8;

    location / {
        proxy_pass       http://127.0.0.1:4000;
        proxy_set_header Host      $host;
        proxy_set_header X-Real-IP $remote_addr;
        proxy_set_header X-Forwarded-For $proxy_add_x_forwarded_for;

   }
}
server {
    listen 80;
    resolver 8.8.8.8 ipv6=off;
    server_name ~^(.+)\.acs\.xingtingyang\.cn$;
    location /{
        if ($limit_bots = 1) {
            return 403;
        }
        proxy_set_header Accept-Encoding "";
        proxy_set_header Host $1.acs.org;
        proxy_set_header X-Real-IP $remote_addr;
        proxy_set_header X-Forwarded-For $proxy_add_x_forwarded_for;
        proxy_set_header Referer $1.acs.org;

        proxy_pass http://$1.acs.org;
        proxy_redirect ~^(.+?).acs.org(.+) $1.acs.xingtingyang.cn$2;

        sub_filter acs.org acs.xingtingyang.cn;
        sub_filter_types *;
        sub_filter_once off;
        proxy_cookie_domain .pubs.acs.org .pubs.acs.xingtingyang.cn;                
    }
    access_log logs/acs_access.log;
    error_log logs/acs_error.log;
}
该日志的模板使用日志创建模板创立,文件名称为mkpost.py,结合listary的命令,随时随地都可以创建日志。

#!/usr/bin/python
# -*- coding=utf-8 -*-

# 使用该命令可以创建jekyll的post

import os
import datetime
import sys
import subprocess

if len(sys.argv) == 1:
    print('请必须输入文章标题!')
    sys.exit(1)

sublime_path = r'---\sublime_text.exe'
post_title = sys.argv[1]
post_directory = r'---'
now = datetime.datetime.now()
post_filename = '{0}-{1:>02d}-{2:>02d}-{3}.md'.format(now.year, now.month, now.day, post_title)
post_path = os.path.join(post_directory, post_filename)

post_template = '''---
layout: post
title: "{0}"
date: {1}-{2:>02d}-{3:>02d} {4:>02d}:{5:>02d}:{6:>02d} +0800
comments: false
---

'''

post_content = post_template.format(post_title, now.year, now.month, now.day, now.hour, now.minute, now.second)


fid = open(post_path, 'w+', encoding="utf-8")
fid.write(post_content)
fid.close()

# 使用sublime_text打开post文件
subprocess.call(["cmd.exe", "/c", sublime_path, post_path])


i-zhejiang(awifi)是浙江在商城、交通枢纽、行政机关等人流密集区域设置的免费wifi热点。

i-zhejiang这个wifi在连接的时候,会打开默认的浏览器并打开授权的WEB页面。该页面会检测打开页面的浏览器是否为手机浏览器,如果是,输入手机号,得到验证码,就可以连接wifi了。而如果授权页检测到电脑浏览器,授权页面会跳转到提示页面,告诉你该wifi只能使用手机连接。那么如何在笔记本中使用该wifi呢,此处提供两个办法?

  • 一方面,可以使用手机连接该wifi并分享热点给笔记本电脑。

  • 另一方面,由于授权页面判断终端类型是基于请求头的User-Agent,那么在默认浏览器上安装一个切换User-Agent的插件,将默认浏览器的User-Agent设置为手机的类型,就可以让授权页面以为打开的是一个手机浏览器,从而进行正常的授权而连接wifi。

如果你不想使用切换User-Agent的插件,那么在第一次认证之后,每次单击连接i-zhejiang的wifi,不管弹出的非手机终端提示页面,只需要执行以下的python代码,也可以最终连接上wifi。

#!/usr/bin/python
# -*- coding=utf-8 -*-

import requests

headers = {
    'User-Agent': 'Mozilla/5.0 (Linux; Android 4.4.2; Nexus 4 Build/KOT49H) AppleWebKit/537.36 (KHTML, like Gecko) Chrome/34.0.1847.114 Mobile Safari/537.36'
}
url = 'http://www.msftconnecttest.com/redirect'
s = requests.session()
r = s.get(url)
print(r.headers)

post_url = 'http://30.254.8.226:8080/page/auth'
post_data = {
    "mobile": "---",
    "authCode": "",
    "isold": 1
}
s.post(post_url, data=post_data)

友情提示:post_data变量里边的mobile字段需要替换成你自己的手机号码。

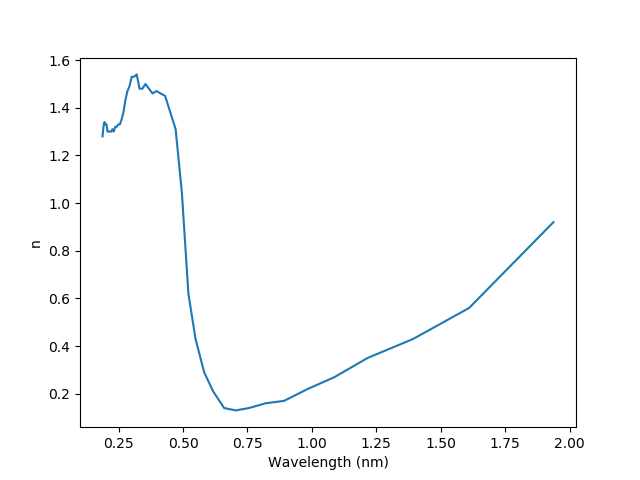
#!/usr/bin/env python
# -*- coding=utf-8 -*-


import matplotlib.pyplot as pl
import pandas as pd


Ag_material = pd.read_csv('Au_evap', sep=r'[\s\t,]+', header=None, skiprows=3, engine='python')
pl.plot(Ag_material[0], Ag_material[1])
pl.show()

diel文件下载:diel.zip

安装必备软件

sudo apt-get install zip unzip gcc gfortran -y
sudo apt-get update -y

安装历史命令

wget http://git.oschina.net/x242025/Shell/raw/master/CentOS/history.sh
chmod a+x history.sh
bash history.sh
rm history.sh

安装ddscat

wget https://github.com/rusterx/mddscat/releases/download/v1.0.0/linux.mddscat.v1.0.0.zip
unzip linux.mddscat.v1.0.0.zip
rm linux.mddscat.v1.0.0.zip
chmod a+x linux.mddscat.v1.0.0/*
mkdir dda.project

暴露ddscat的位置

echo 'PATH="$PATH:~/linux.mddscat.v1.0.0"' | sudo tee -a ~/.profile
source ~/.profile
sudo ln -s ~/linux.mddscat.v1.0.0/ddscat /usr/bin/ddscat

安装监控软件

cd ~/dda.project
wget https://gitee.com/rusterx/monitor/repository/archive/master.zip
unzip master.zip
rm master.zip
chmod -R 777 monitor/*

安装python环境

sudo apt install python python-pip -y
pip install bottle

暴露监控位置

echo 'PATH="$PATH:~/dda.project/monitor"' | sudo tee -a ~/.profile
source ~/.profile

设置vim偏好

# 设置vim
echo 'set ts=4' | sudo tee -a /etc/vim/vimrc

删除冗余文件并重启

rm ~/init_ddscat.sh
sudo reboot